The first step is always the hardest to take. Now that you’ve made it this far into the Getting Started chapter, you’ve already taken several steps. Congratulations on getting through all of the necessary setup.
In a way, actually building your first theme can feel like another first step, but you are ready to trek out into the wilderness and beyond. Don’t worry—this guide will walk with you as you set out on this journey.
Activating your first theme
One of the best ways to understand how to build themes is to look at and study existing themes.
Even in advanced development circles, one of the cornerstones of sound development is to reuse code. This is because developers understand that this is the most efficient way to get things done, and many try to abide by the “don’t reinvent the wheel” mantra.
Regardless of whether you are a developer, this is sound advice. You don’t need to build everything from scratch. There’s a good chance that most of what you want to do has already been created by someone else.
So, your next step is to activate an existing theme.
Choosing a theme to learn from
Packaged in every version of WordPress since version 3.0 (and named after the year they were released in), the default themes are some of the best to study how themes are built. This is because they are designed with broad use in mind and fully adhere to WordPress coding standards.
Because this handbook primarily focuses on modern, block theming, you should choose one of the newest default themes:
It’s typically best to use the latest default theme. This is because it will be built with the most up-to-date features in mind. Plus, it should already be activated if you’ve recently installed WordPress:

You can also choose any theme from the official Theme Directory to learn from, but for the purposes of this guide, it should be a block theme. For more information on installing and activating themes, read the Work with themes documentation.
If your interests lie in classic WordPress, you should jump forward to the Classic Themes chapter for more details on building classic themes.
Customizing your theme
Once you’ve activated a block theme, take some time to simply have fun exploring and tinkering with the available options in the Site Editor. Essentially, this is an editable, visual representation of your theme in the WordPress admin.
And, as promised earlier in the Getting Started chapter, you can build your theme entirely from this interface without touching a single line of code.
You can locate the Site Editor via Appearance > Editor in the WordPress admin menu. Once opened, your screen should look similar to this:

There are a lot of pieces to this, and you can find yourself lost for hours just tinkering around in the Site Editor. It can be fun, and you’ll learn more about how this integrates with your theme as you read through this handbook. For now, let’s get to the basics of “creating” a theme.
This part of the journey can be entirely self-directed, so feel free to do this at your own pace and in your own way. But most people will want to begin by adjusting their design.
You can do this by first selecting the Styles item in the menu panel:

The Twenty Twenty-Four theme (and many other block themes) include pre-designed style variations, which you can see in the sidebar in the above screenshot. You will learn more about these variations in the Global Settings and Styles chapter, but feel free to use one as a starting point for your own customizations.
The next step is to select the Style Book icon (it looks like an eye). Opening this screen will give you full access to modifying the global styles of the site:

At this point, the world is your oyster—in other words, feel free to let your creativity run wild. But most importantly, get a feel for what settings and styles are available in the interface. This familiarity will come in hand as you dive into more advanced sections of the handbook.
For a deeper dive into using the Style Book, read this guide from the WordPress Developer Blog: The Style Book: a one-stop shop for styling block themes.
Exporting your theme
Once you’ve customized the theme to your liking, be sure to hit the Save button. When you’re ready, you will “create” your first theme.
You have two options for doing this. The first is to use the built-in exporter from the Site Editor in WordPress. The second is to use the Create Block Theme plugin, which has more extensive options available. There are instructions for both methods below.
Exporting from the Styles interface
To export your theme from the Site Editor interface, click the ⋮ (Options) button in the header area. You will see a dropdown of available options. Click the Export option, as shown below:

This will give you a ZIP file with your complete theme in it. The filename will match that of the theme you were working from. In the case of the default Twenty Twenty-Four theme, it will be twentytwentyfour.zip.
Congratulations! You have now successfully created your first WordPress theme.
You were assured that you could create a theme without touching code. That was the truth. You have built a theme that can be uploaded to any WordPress website just like any other theme.
But there was a fib—a harmless white lie—mixed in with that truth about there being no code involved.
The theme you downloaded is still named “Twenty Twenty-Four,” and it’s best to rename it so that it’s representative of what you’ve created. To do this, unzip the twentytwentyfour.zip folder and rename it to your-theme-name.
Then, open the style.css file within that folder. You should see something like this at the top of the file:
/*
Theme Name: Twenty Twenty-Four
Theme URI: https://wordpress.org/themes/twentytwentyfour/
Author: the WordPress team
Author URI: https://wordpress.org
...
At the very least, you should adjust those first four lines, particularly the Theme Name value. And that’s all the code you really have to touch.
As a final step, zip the file again with whatever utility program you have on your computer for creating ZIP files.
Using the Create Block Theme plugin
The Create Block Theme plugin is an official, first-party plugin that WordPress contributors maintain. Often, you will see new ideas for exporting themes tried and tested here before they land in WordPress.
The plugin is more robust than what you will find in core WordPress, meaning that it has many more options for exporting your theme. This guide will only cover the basics of exporting your theme, but feel free to explore the plugin’s features in more detail.
Once you’ve activated Create Block Theme, you should see a new button in the Site Editor that is displayed as a wrench icon. Click this button to open the Create Block Theme menu.
You will see several options for saving changes, exporting a ZIP, editing theme info, and creating a new theme:

You can use the Export ZIP option to export the theme as you did earlier.
But Create Block Theme offers more customization options that you’ll want to use for truly creating a custom theme. Click on the Create Theme option:
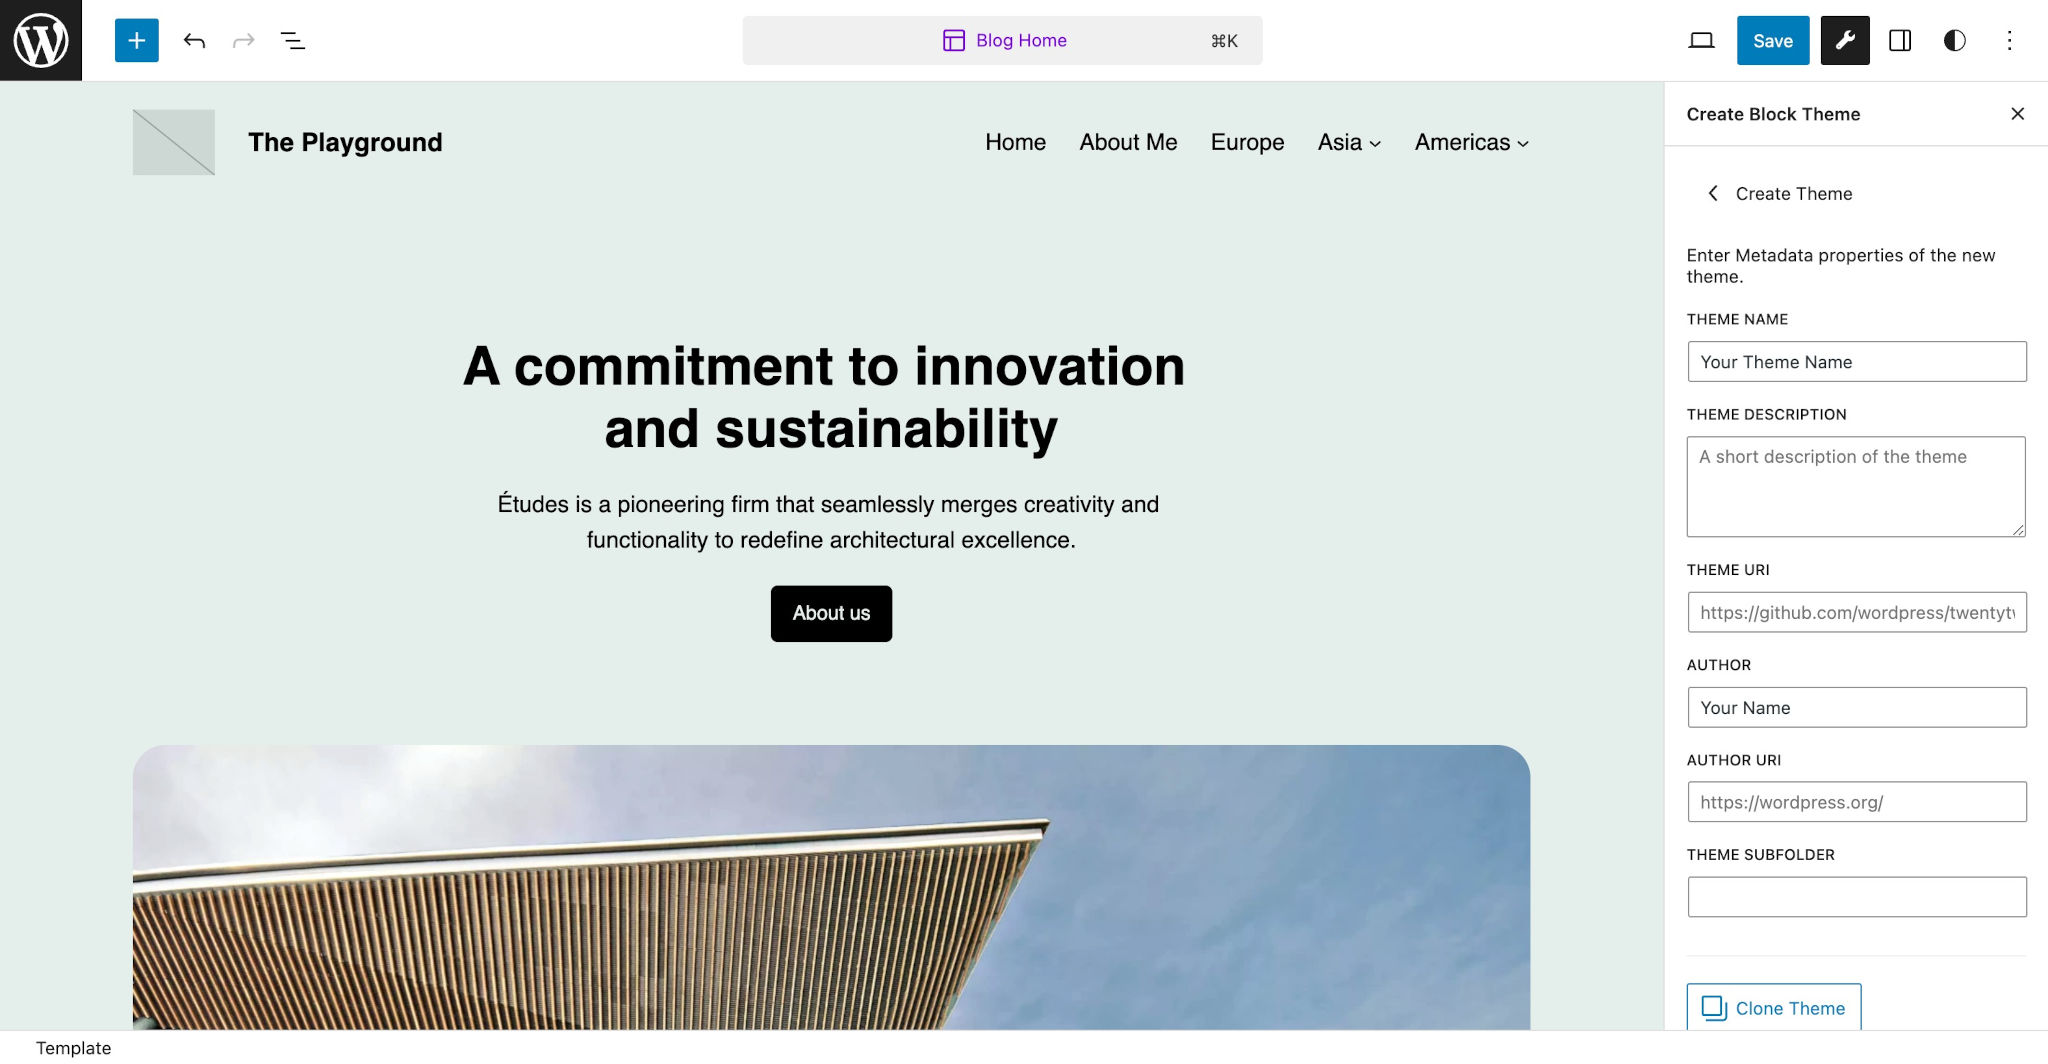
From there, you’ll be able to customize all of the information about your theme to make it unique. Once finished, click the Export Theme button for your new theme.
The one thing that Create Block Theme does not yet do is let you upload a custom screenshot. You’ll still need to add a unique screenshot.[png|jpg] file in your theme if you intend to distribute to others.